Inside - Part I - Equipping an Inside Greenhouse
 |
| DD 2-1/2 Dogs |
Most of this project has a 1 Dog DD Degree of Difficulty. However, the LED light strips have a short learning curve & if you're like me, you'll have to order connectors you didn't think to order with the roll.

I started with inexpensive IKEA wood shelves seemingly designed to hold full-size seed trays: GORM Shelving $29.99 300.585.08.
 I added diamond plate steel shop lights: Lithonia Diamond Plate Shop Light $29.97 , no special bulbs are needed.
  More recently, I added LED light strips like these: 5050 LED Waterproof Light Strip. Basically, the flexible SMD 3528 LED light strips have one LED light emitting chip per source & the 5050 SMD has 3 chips in one housing. You need that power to achieve the needed light & heat for germination. The benefit over the fluorescent fixture is reported to be a higher light level at lower power consumption.
More recently, I added LED light strips like these: 5050 LED Waterproof Light Strip. Basically, the flexible SMD 3528 LED light strips have one LED light emitting chip per source & the 5050 SMD has 3 chips in one housing. You need that power to achieve the needed light & heat for germination. The benefit over the fluorescent fixture is reported to be a higher light level at lower power consumption. I also supplied bottom heat. I added my LED Christmas lights under a cookie sheet for extra good measure just until the second full set of leaves emerged. I provided air circulation, but prevented AC drafts that could stunt growth. I placed a sticky (boy is that an understatement) fly trap to catch gnats. I put it in the center of a shelf, away from drafts - gnats will congregate in still air. Besides, you do not want these traps at your entry points - I got one stuck in my hair that way. Lesson learned! I covered the whole kit & caboodle with plastic sheeting, closed at ends with clothes pins. I can accessed the shelves easily from the sides to water and adjust lights. Lights need to be just above the top leaves - higher and they'll be spindly.
Outside - Part II - Making a Cold Frame
 Making the cold frame involves cuts on an angle, Jig Saw or Circular Saw, hammer, However, the LED light strips have a short learning curve & if you're like me, you'll have to order connectors you didn't think to order with the roll.
Since I was starting seeds under lights in the house, I needed a good place to harden them off before planting. If I wanted to extend my growing season, I needed a cold frame big enough to accommodate standard 11.5” x 22” seed trays. I thought that I’d be better off with room to suspend four to six trays. I started with a photograph found in a Pin. I read posts by bloggers, with experience in building cold frames looking for clear directions & advice. Clear directions were not to be found, but oddly, they uniformly regretted their self imposed limits - they wished their cold frame was bigger! I wondered the regret was a case of a gardener dreaming of a greenhouse & settling for a cold frame. I took the picture & considered the advice & set out to buy or find supplies.

I found enough cedar on sale at a big box store to make a chest with no bottom, the back side higher than the front to catch the light, deep enough for leafy plants, width sufficient to hold the length of plant trays & long enough to hold four to six trays.
Knowing the dimensions of the cedar gave me basic information needed to develop a simple sketch & notes with dimensions.
- Specific dimensions were calculated:
- Standard plant trays area 22.5" X 11.5". I saved trays from other planting projects & had plenty for either dimension.
- Cold Frame Width - 22.5” (with 1/2” for wiggle room to accommodate the length of the seed tray.)
- Frame Minimum Length: four trays, 11.5” * 4 = 46”, or for six trays, 11.5” * 6 = 69” long.
- Frame Front Height: I planned on hanging the plant trays on rails approximately 4" above the bottom edge of the wall for good air circulation & drainage out of the bottom of the trays. I added another 4” for the tray itself. I decided to add another 8” for the growing leaf layer from the top of the tray to the window. 4" + 4" +8" = 16” tall (you may have other needs and will adjust your plan to accommodate your plants).
- Frame Back Height: I wanted to add about 8" to the height of the front wall to get a nice angle on the window. 16” + 8” = 24”.
- Window Length (Estimate): Before making any more calculations, I needed to buy a window. To fit the trays, it needed to be at least 46” or 69” long . The window should be a bit longer than the combined width of 4 or 6 trays, or the trays will be as tight as a row of airline seats. It can be longer, since it sits on top of the frame, overlap is acceptable.
- Window Width (estimate): I also knew that it needed to be wider than 22.5", the depth of the box & length of the plant trays. The more difficult part needed a thought or two & calculations using that algebra that, we swore to each other, we'd never use again once we left school, Thinking things through, I figured the window needed to be wide enough to span an opening that was wider than the opening because the top of the back wall will be higher than the front, but just how wide does the window need to be? Algebra held the answer. (Remember that Pythagorean Theorem?) The window, stretching from the lower front to the taller back would form the hypotenuse of the right triangle, marked as "C" in the diagram. The equation for the hypotenuse of a right triangle (I bet you never thought you’d use that again!) When you have a higher back than front, you create a right triangle, so window width can be estimated as the hypotenuse of that triangle based on the known base and height.
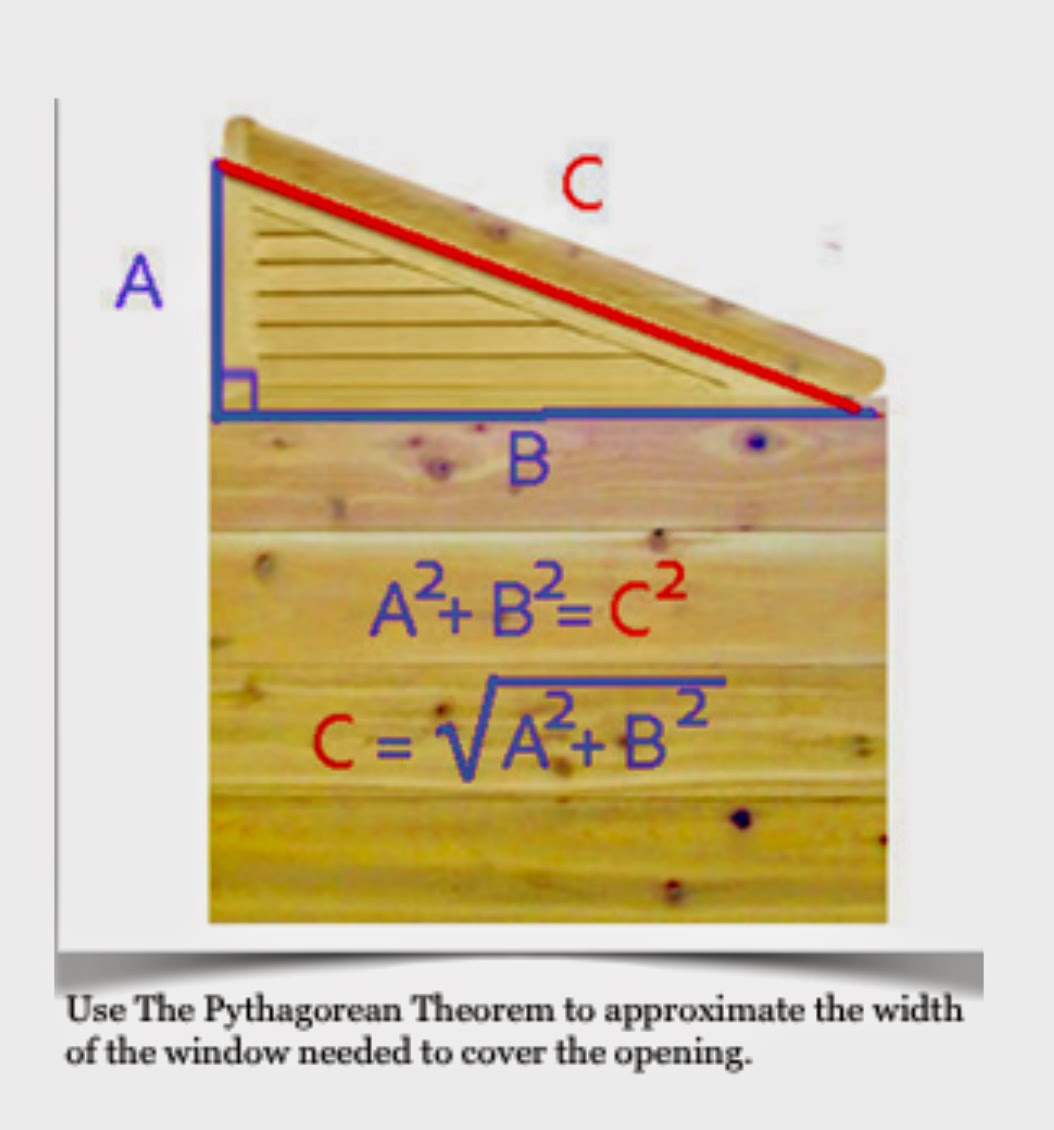
Pythagorean theorem formula for right triangles is A^2+ B^2 = C^2. If you can fill in two of the three variables, you can calculate the third. "A" and "B" were known by design, so I solved for "C", the minimum width of the window.
- ”A” is the rise of the back above the front lip (8”), A^2 = 64
- "B" is the width of the cold frame, 22.5" and B^2 = 506.25
- "C" is equal to: √ (8^2+ 22.5^2) = √ (64+ 506.25) = √ 570.25. = 23.88". I needed to find a window that was about 24" or slighting wider (an overhang of an inch or so can be eased into the design).
If I already had a window, I would solve for "A" & fill in "C" &"B" to calculate the height of the back wall above the top of the front wall - "B" is the length of the trays, a constant for practical purposes. A window wider than 24" wide, would need more than an 8" taller back wall like that in the previous example. There are several variables, but the solution remains relatively easy. that will fit the window onto a box that is the correct size. "A" = √(C^2 - B^2). (Oh, wouldn’t Mr. Henderson be proud to know that I remembered this bit of algebra?)
I found a window at the Habitat for Humanity Resale Store, a real beauty with divided lights & muntins. It was just the right size. A piano hinge on the back was the perfect solution for joining the window to the back wall. It was easy to lift and quite stable. I thought about adding legs below the level of the tray bottoms, I wouldn't lose tray space. I decided to set my frame on top of bricks instead, to easily get airflow under the bottom edge. I also made a notched stick to hold the edge of the window up for ventilation. I bolted it to the side, with doubled up washers for slip, but I put it on the outside, so I can't use it since the window doesn't overhang the edge by much. I made another one with notched out triangles on both ends to catch the edge of the frame and the edge of the front wall. The window is long enough that I really should have made two props, to keep the window from sagging.
 I recommend this relatively easy utilitarian project because it is very useful for seed starting and I have gotten very good use out of mine - in Spring when I was ready to move seedlings outside, In Fall when a frost threatened the late season containers & as art. My husband came home dragging a twin headboard & foot board for my "baby bed". Later, I added counting sheep, resting in their "incubator" We didn't want to have it lacking in purpose after spring seedlings are planted…
No comments:
Post a Comment