Wednesday, April 5, 2017

Working Draft

Trump-Russia is Red Dawn, beyond ordinary contact. This isn't, "Six Degrees of Kevin Bacon".  I've read & tried to understand the connections, but I'm a visual thinker, so I pulled up my trusty flow cart ap. I've upsized everything three times. If you're looking for perfection, keep looking. If you send me a correction, I'll get it edited. 

I took some advice & followed the bodies. Never again. This is no joke. I'd hate to be on The Trump Tream & disappoint the Red President. 


Saturday, March 12, 2016

Deck the Walls

Things look quite gloomy as rain looms on the horizon. Snow has receded again, but Spring is not yet able to brighten sky & flowers at the same time. I, like Alice's rabbit, am LATE! Rob & I have been saving for a balcony & deck on the back side of our house. We have three sliding glass doors on the back side, one next to the kitchen on the 2nd floor & two on the gallery level, 1/2 floor above grade. We'd love to have something bright, modern & modular, starting out with deck, rails & stairs as needed & adding shade structures as funds permit. We have Dryvit siding & would prefer not to attach the deck to the house. If possible, we want a 4" drain between the decks & freestanding structures.  I think mezzanine kits may be just the thing to suit our needs. Our next step is to contact a supplier to receive a turnkey estimate. I'd better hurry!

Articulating our wishes is the first step & since a picture is worth 1000 words, I went to work on images. I'm using 5d IPad app to estimate size & configuration. Anyway, it's a beginning. Unfortunately, by now, our deck should be ordered for spring installation. 


Daylight at the End of the Tunnel


I leave all of the dry stems in the garden for wildlife cover and housing for native bees. In the spring, that means I have work to do before green things poke their heads very far out of the ground. Although I would prefer to get in the garden a couple of weeks earlier than the day the clocks are turned back, this year my first garden adventure is on the last morning I'll roll out of bed feeling wide awake. Tomorrow, I'll be chugging coffee & cursing Ben Franklin.  What follows is a one day gardening prep list. Back in 2014, I did a more detailed blog and yes, I do still follow that list every year. Now, my husband helps more than ever.

Grasses.  Shear dry leaves 4 - 6" above the ground, at least a hand's height above the crown or you may kill the plant. 

Perennials.  Some perennials are brittle & snap near ground level with a twist of your hand. Grab a handful of stems a few inches above the crown and press quickly down and to the center of the plant. Most dry stems will snap right off.  I try this method first because I find it so satisfying. Some require pruning with shears, hori (a serrated knife) or hand pruners. In most cases, cut away the drive stems and dead plant material, cutting as close as possible without damaging the crown.

Roses.  Sanitize the site carefully by cleaning out leaves & debris. Prune out dead wood as close to the crown as you can without damaging the crown. I cut all stems back to about 12 - 14", then I prune for bud location. If the top buts is pointing into the middle of the bush, I cut below the bud so the branches will grow out, producing better air circulation with new growth. Cut at an angle, close to the next bud, but not so close that you damage the bud. 

Shrubs.  Some shrubs have finer, brittle branches and are best pruned by grasping the branch near the joint where two other stems branch off to the side, or outer edge & snapping the top off. Just pinch, bend & push to snap off the overgrown branches on shrubs like azaleas, wegelia, spirea & etc. this produces a quite natural form while keeping overgrowth in check. 

Other shrubs with thicker branches are pruned like trees, using proper tools & sanitary practices. 

Trees.  Sanitize the area & prune with clean tools. Select branches to remove those that rub, grow into the center, compete with the leader at the top, show signs of damage or disease. Cut at an angle, near to the crotch or the branches, but not so close that you damage the site where you want new growth to occur. I use images available from the Arbor Day Foundation as a refresher. I never lop off all of the branches to keep a tree artificially smaller as it makes the tree weaker & more susceptible to disease. DON'T TOP CREPE MYRTLES. 

Clean Up.  Sanitize the area by raking out trimmings, leaves & debris. I'll have to be very careful, since new growth is already peaking. This is the best pest & disease control I'll do all year. You can leave your debris pile in an area for native bees & other native insects. I compost some & leave some in a back corner. 

Mulch.  3 - 4" of mulch applied in a layer that comes close to trees & shrubs, but not in direct contact, will retain moisture, reduce watering needs & look fabulous. Mulch can be an entire topic of discourse, but briefly, I choose to use natural cedar mulch, not from lumber, & not dyed artificially. I have used pine bark & pine straw. Each has advantages & disadvantages. Mostly, I use what's cheapest and most natural. Mulch lasts for 1 to 3 years, depending on the amount of rain and snow you receive. I try to keep five bags on hand for supplemental mulching. I have landscape cloth under my mulch, so it is very easy for me to pull weeds that root in the mulch. I don't rake out old mulch, I just keep adding new as it gets thin or as it decomposes.

Saturday, April 18, 2015

The 20 Minute Garden - Introduction


I am a 20 minute Gardener and you might be too. We all have a tug of war with gardening disposition (née, addiction) at one end, and other devotions at the other end (job, kids, clubs, sports, faith activities, and all the other commitments we are disposed to servicing). 


The 20 minute garden is accomplished in three phases: 
  • 1st & 20: Plan, Checklist, Prioritize. 
  • 2nd & 20: Labor, Blaze, Do. 
  • 3rd & 20: Experience, Listen, Feel.


I am blessed with a husband willing to participate in phase 2 and 3 & 20, a contribution that is a multiplier, not simply addition. Sometimes he feels like Sisyphus in the garden. The gods had condemned Sisyphus to roll a boulder up the mountain, and every day, the boulder would roll back down. Viewed that way, gardening would be a punishment, if not for my gratitude, specific assignments & 3rd & 20, with a cold beer.


I aim to complete all three phases, every day, but even three days each week keeps the garden growing.


 Read The 20 Minute Garden in Garden Expressions: http://www.gardenexpressionist.com/the-20-minute-garden.html


Thanks to inspiration from Maridan Valor, a young woman & blogger who inspired me to journal. I write mostly about gardening. It helps me to keep track of what works and doesn't work in my garden & to remember what is done or needs to be done. 

Friday, March 27, 2015

Garden Scents, Cents & Sensibilities, Beyond Visual Appeal


    Much of what I admire in garden design, I learned to love from the time I was just a caterpillar. I learned that the garden looked and smelled good. We delighted in found objects and shared the bounty. I learned to tread lightly as an intruder, in a place where bees and snakes belonged as much as butterflies and ladybugs. Still, there was an ease about the garden. Additions contributed to that ease, or out they went, like a weed. Expectations raised, I felt prepared for contemporary gardening where planning produced a multi-sensory, beautiful, fragrant, vigorous and adaptable, ornamental and edible garden. Every gardener moves the practice, and we now apply interior design principles to complete the garden from ground up, with art, rooms and rugs. Gardening fulfilled makes scents, cents & sensibilities.

    Scents

    My garden wishes are filled with memories of my Grandma's nose buried in the center of childish fistful of violets, their scent forever associated with her soft, sun warmed arms. Do I remember her garden? To this day, I can still close my eyes and see the secret location of Grandma's bluebells. My love of fragrance in the garden comes with a love of native plants, the plants of my childhood memories. Later I learned that native plants are almost always more fragrant than their hybridized counterparts.

    I admire Piet Oudolf, the Dutch Master of Gardens, who, consistent with my childhood foundations, creates visually stunning gardens, planted in naturalized drifts, with graphic patterns of color and texture for all seasons. Unlike the majority of designers, Piet pays close attention to scent, drawing in pollinators and giving visitors the deeply intimate human experience of being wrapped in sweet perfume. Since we aren't likely to have Piet walk by and volunteer to paint our gardens with fragrant plants, we'll have to make "scents" of the garden on our own.

    Cents

    Our practices in the garden make or take "cents". Lawns are expensive for what little pleasure they provide & frankly, I’m limited in the amount of work I can do, so low maintenance gardening is my goal, like most. No garden is no maintenance, but lawn requires more than weekly care with fertilizer and pesticides, spread in regular intervals, all in an attempt to make the wrong plant happy in the right place. To reduce the impact and cost of chemical support, my beds have been eating the lawn for years now, with only a 10’ x 16’ amebic shape remaining.

    Making “cents” in the presence of long term drought conditions, requires a low water, environmentally sustainable garden. Native plants, with deep root systems, bread from genetic evolution concurrent with climate change, are hardier in good years and lean. Piet Oudolf relies on plants that thrive in stark or low nutrient conditions and packs them tightly to discourage weeds,  increasing survivability, reducing chemical controls and water usage, saving money, making "cents".  

    Climate may be beyond our direct control, but there are a number of factors immediately within our wheelhouse - best practices for properly planting the right plant in the right place, watering infrequently and deeply, mulching to retain moisture, sanitation of grounds and tools, reduced use of chemicals, pruning, knocking down invasives, and dividing as needed to multiply and invigorate plants. 

    Sensibilities

    Sensibilities come from closely held values and personal preferences, family experiences, a lifetime of forging personal style, special places, environment factors and a thousand other influences that make one like or dislike someone or something.

    On my father's side I had my Grandma's warm arms and bright bluebells, and on the other side I had my Aunt, the original upcycler. She was an artist with a fantastical garden. Her garden was her masterpiece, an Impressionist's dream, with wide swaths of contrasting colors and textures. Dotted with art and hidden rooms, she was a leader before there were pins on Pinterest to show us the way. Paradise even had a snake. As little girls, my cousin (her tow headed daughter) and I (my hair almost black in contrast), in harmonic, high pitched squeals of terror, begged her to slaughter a terrifying snake. Sssssaid snake carelessly flicked its forked tongue our way. We showed her where it went and she taught us that we were the pests in her garden, and the garter snake the one who belonged.

    Sensibilities are visual and tactile. They come from admired artists, stylists and interior designers. Mix or match color (contrast or ombre), scale (small, medium or large), texture (soft, fine, glossy, coarse, matte) style (traditional, transitional, eclectic, contemporary, modern) and purpose (active youth, dog friendly, entertaining, respite, hospice or retreat). If you think about it, the land is your canvas, the plants are your separates, the sections are your rooms and the garden is your stay-cation. 

    It is in our best interest to value the residents of the garden, from bees and other pollinators for fruiting to snakes that control rodents. When action follow values, a garden is made more vital. Show concern for fragile migrants. Monarch butterflies are under particular stress from reduced habitat (development, herbicides and rights-of-way mowing of their only "whole life cycle" host plant, milkweed) and disease. Garden for Monarchs, so carelessly perched on the brink of extinction that our grandchildren, or our children's' grandchildren may only see them in museums or images. Please find a place for milkweed (a misnomer that hardly does justice to a beautiful plant). Find regionally native milkweed; plant it in a corner of your garden; plant it and they will come!

    Perhaps the most sensible reason to garden of all, there are the health and well being factors to consider. Studies now show that gardeners experience emotional and physiological benefits from gardening - "Immunity, blood pressure and peace, Oh My!" ...

    Are we still having fun? Not surprisingly, I am. My garden is a reflection of my scents, cents and sensibilities, my recipe: a dash of Grandma, a pinch of Italy and pound of Aunt Gean, mixed with resilience, availability and vigor, beautiful and strong. If you design a garden around your sensibilities, you'll have a place worth loving. Apply what you know about design and you're sure to create a garden worth visiting.

    In Practice

    I highly recommend Pinterest as a starting place for your garden plan - there you may find a style you love. Keep a visual firmly in mind as you add and subtract your way through your space. I began by looking at landscapes planned by Piet Oudolf - I found his naturalized, low water, deeply rooted, tightly packed, odoriferous gardens to be worth emulating on a smaller scale.

    I also had a collection of pottery fish on stakes to incorporate. With the images of Lurie Garden in mind and fish in hand, I turned to a few favorite online resources with the goal of selecting 2-3 plants to populate each of several garden layers. I wanted a broad carpet of ground covering or low growing grass to simulate waves of water (for the fish), low-mid perennials, mid-high shrubs and sky high trees. Sometimes, we, I, as an unapologetic plant collector, tend to add hundreds of plants, no two alike. Sadly, I have learned that undisciplined plant collecting leads to chaos and not to an aesthetic result. (I’m trying to curb my plant addiction in my bed additions, but it’s so very difficult).


    To help me curb my plant addiction, I learned how to approximate a landscape plan, a horizontal map of plant symbols drawn to scale. A landscape plan keeps you focused on your goals, like shopping with a list and not when you're hungry keeps you on task and on budget. I use photo manipulation apps (Photoshop) to visualize the vertical appearance of plants at maturity. I make simple mash ups, scaling plants using an object of known height, like an existing shrub or my fish in the picture for scale. Remember that it is nearly impossible to illustrate the way the garden will look seasonally, because everyone photographs plants when they’re in bloom, making it very difficult to visualize seasonal changes. Think of seed heads and plan for seasonal interest.

    Planning seems to have worked well. On our last expansion into the lawn, our bed went from denuded to lush in the first season. However, the majority of what we planted was seed grown, regionally native stock. Given challenging site conditions, a cool & wet spring, followed by a hot and dry summer, I think that careful planning and proper planting of quality native plants produced excellent results, and not by coincidence.
     

    Repeatable

    For there to be method in my madness, the results need to be repeatable. I believe they are, given other examples I have found in research and locally in friends' gardens. A wealth of online resources and wonderful books are filled with fabulous detail on native plants (wildflowers and more). A good place to begin your research is at the Lady Bird Johnson Wildflower Center (www.wildflower.org). The Wildflower Center has a data base of wildflowers, and boxes you can select to filter the search set for a variety of characteristic.

    For example, a search for the area of Folsom, California produced more than 2,500 results (individual native plants). By height range, plant type  (shrub, tree, herb, etc.) and condition (sun, shade, wet, dry, sand, clay, and etc.) you may "drill" down, truncating the list to those native plants most likely to survive the site conditions. The Wildflower Center allows for refinement by many other botanical characteristics.

    The California site requires special consideration for the prolonged western drought. The subset of dry soils narrows the list to 474 plants. A comparison of plants in four garden layers, can be cross checked for local availability. From there, it's a matter of a personal preference, keeping in mind scents, cents and sensibilities.

    A sample selection is shown below:


    • Carpet Layer: Sand Verbena  & Angel Trumpets purple & white.


    Notes:


    • Mid Layer: Angelica , Wooly Pod Milkweed  & Showy Milkweed  

    Notes:


    • Eye High Layer: Serviceberry,  Bush Anemone , Western Spicebush, Buttonbush  & Red Currant.


    Notes:


    • Sky Layer: Acacia Tree, Honey Locust - Sunburst thornless Gleditsia triacanthos var. inermis variety  & Douglas Fir.  (May have existing Douglas Fir, iffy, but Cali has lost so many, you may want to try for the sake of preservation.)

    Notes:


    Additional Regional Resources

    Best booklet: A California-Friendly Guide to Native and Drought Tolerant Gardens (http://lvmwd.com/home/showdocument?id=711)

    Santa Monica Parks Design - incorporates the styling of my all time favorite designer, Piet Oudolf. You may find and apply elements in this plan in your garden, wherever it is, using his well laid out examples and regionally native plants. The documents include the following particularly helpful design elements:

    1. - Slope Planting Detail
    2. - Park Project Plan
    3. - Garden Walk Plan in Action

    (http://www.santamonicaparks.org/design-1; http://www.smciviccenterparks.com/design/)

    Learn where to purchase plants. No matter where you are, there are resources to help you find plants that are native to your region. Seed collecting and wild harvesting is considered to be poaching - often illegal, so make sure what you are buying is locally produced from seed (preferred) or by cloning (from cuttings or tissue cultures. Cloning produce identical copies - good, but more susceptible to problems, if a pest or disease attacks one - it attacks them all). Connect with your local chapter of Wild Ones Natural Landscapers, Inc., Native Plant Society, Environmental Protection, Fish & Game, USDA Government Plant Files, local parks, public works & planning offices and many more data sources for information you can use in your garden. Be prepared, creative, personal and amazed at what you can accomplish in your garden.

The Diaper Debate Super Absorbent Polymers: To Harvest or NOT to Harvest, Diaper or Bulk, Urine Soaked or Not...


The Diaper Debate
Super Absorbent Polymers
We’ve all seen the Garden Hack where a disposable diaper is used for its absorbency crystals, to absorb and preserve moisture in potting containers. Sometimes called Petroleum (or Polymer) Absorbency Material  (PAM) or Super Absorbent Polymer (SAP), we are talking about the crystals that swell to 300 times or more their weight in liquids. The way these crystals are supposed to work, the gel absorbs moisture in the good times and transfers water to the plant when the soil dries out. SAP is also used in disposable diapers to keep moisture under the cover and away from baby, hence the garden hack - to harvest SAP. Recycling diapers is an interesting notion, but I have several questions that need to be answered before I'll be diaper mining.  Does it work that way it's supposed to work, is it cost effective to harvest SAP from disposable diapers, and if the diaper has been used, is it safe to use in plant soil?

Just how much SAP is in the average disposable butt cover anyway? It turns out that the answer to the question regarding the SAP content in disposable diapers is variable - at least two or three fold - too much for the landfill and not enough or too much for most soil mixtures. A diaper holds 10 to 15 grams of powdered SAP, enough to absorb 106 - 159 oz of liquid, so I can see where it would matter what the gel absorbed.


How much does that diaper cost though? The most absorbent diapers cost between 25 and 50 cents per diaper. Harvested from a diaper, SAP would cost about $1.25 per ounce on average (if you could actually recover all of the SAP from the diaper). I found several offerings of bulk SAP readily available online for about $10 per pound, or $0.62 per ounce. In contrast, bulk SAP is less than half the cost SAP from diapers.

Should we try to recycle the SAP in disposable diapers from an environmental and practical standpoint?  SAP is petroleum based, and not sufficiently biodegradable for environmentalists. Therefore, if the SAP were somehow harvested, recycled and packaged for use in gardening, it could be a very good thing. Disposable diapers, specifically those made for use in swimming pools, may be washed two to three times and air dried (NOT those that are soiled) before they begin to fall apart. It would be possible to harvest cleaned SAP from swim diapers, although they owe the fact that they do not swell to their lower amount of SAP. It does raise the question though... Can the home gardener clean and harvest SAP from regular disposable diapers for use in soil mixtures? (There are several academic exercises online with instructions for harvesting SAP from clean and dry disposable diapers if that is your goal.)


Yuck factor aside, can SAP harvested from used and wet diapers be used in planting mixes? Apparently, urine may be an acceptable, effective and organic fertilizer. “Urine is chock full of nitrogen, potassium and phosphorus, which are the nutrients plants need to thrive—and the main ingredients in common mineral fertilizers (as reported in Scientific America, July 23, 2010, Mara Grunbaum). An adult on a typical Western diet urinates about 500 liters a year, enough to fill three standard bathtubs. And despite the gross-out potential, urine is practically sterile when it leaves the body. Unlike feces, which can carry bacteria like salmonella and E. coli, urine poses no health risks—astronauts on the International Space Station even drink the stuff—after it was purified.” (see footnotes for citations)

My next question is, how much urine is appropriate for use in a container, like a hanging basket?A study garden shows that “The urine that one person produces can fertilize about one square meter of soil a day? An output of 1.37 liters or feeds approximately 10.67 square feet of garden area per day. Converted to English units, that amounts to 46.33 ounces or 5.79 cups of urine per day. At that application rate, that equates to just over 1/4 cup of urine for a two gallon planter. Since hydrated gel is nearly all liquid, the SAP from one diaper could hold up to 20 times more urine than is needed. Gee Wizz - that's a lot of nitrogen!
Given the variability in the urine production (how would you figure the volume of urine in the used butt cover?) how would you apply the appropriately amount of “fertilizer” for your container? I guess you can come close with calculations like those used for the two gallon planter, or you can reduce urine content by washing the gel. Are you really willing to wash disposable diapers? The main risk would be that the diaper could rupture. Water logged SAP would NOT be good for your plumbing.

A very thorough counterpoint is contained in the analysis, “Miracle, Myth or Marketing: Super-Absorbent Water Crystals” by Linda Chalker-Scott, PhD, who says,
  • "Cationic PAM hydrogels should not be used in gardens and landscapes."
  • "Unfortunately, on-the-ground conditions can prevent PAM hydrogels from functioning optimally. Fertilizers and other dissolved substances can interfere with hydrogel water-holding capacity. Hot, dry weather conditions can lead to increased degradation and decreased effectiveness of PAM hydrogels. And for every success story, one can find a situation where hydrogels have failed to function."
  • "The best news for those of us managing a home garden or landscape is that simple changes in management practices are often superior to using polyacrylamide hydrogels. In several cases, alternative water management strategies had higher success rates than usage of PAM. These strategies were as simple as adding 2 liters of water when planting Pinus patula seedings, or providing wind protection to reduce water stress in muskmelon. More commonly, mulches (especially organic) were rated superior to hydrogels in terms of erosion control, enhancing water infiltration and conservation, plant growth and establishment, and nutrient value."
The data on efficacy is mixed. According to multiple sources, including one published by Global Post, SAP can be so good at absorbing moisture that it can even over dry skin causing contact rashes and dry cracked skin in diapered babies. If that’s the case, can we depending on these crystals to impart moisture to plants? Maybe. I think it would depend on the plant structures, whether they are soft or woody. Other research has shown that SAP can be effective in delaying moisture evaporation and in supplying moisture to plants. Another study showed that results depend on how much SAP is used - more is not better and can cause plant damage as the swelling gel forces out oxygen, filling all voids with water logged gel. “Eventually, regarding many studies done about super absorbent polymers in green space, it can be concluded that using this substance lonely, or with incorporation of other xeriscaping methods, in particular in arid and semi arid green space has many merits." It turns out that there are many factors determining the amount of gel required for the best performance - more than soil volume and urine content (Sivapalan 2006; Zohurianmehr 2010 as cited in the Iran study). 

Finally, returning to the questions posited in the beginning, “To Harvest or NOT to Harvest, Diaper or Bulk, Urine Soaked or Not…” After careful review of the issues, I will not be diaper diving to harvest SAP from unused diapers at twice the cost of SAP purchased in bulk. Nor will I be gathering urine soaked SAP from used diapers. I may not even use SAP purchased in bulk now that I realize how variable the results can be and how many factors need to be considered before measuring out the first teaspoon full of dry, urine free crystals.

I have high hopes for a market response to the very real potential for producing recyclable absorbent materials that are earth friendly.

If (when) you find errors, or have comments, I really appreciate feedback, especially if you can think of an easier way to present the information. Believe me, I did not imagine the issues would be this complicated.


Footnotes

3- 21 Disposable Products Toy Can Reuse, by Paul Michael on 14 March 2012, http://www.wisebread.com/21-disposable-products-you-can-reuse
5- If I assume a depth of about 1/2 foot of urine penetration into the soil to approximate the volume of soils for the purpose of comparison, the volume were talking about is approximately .152 cubic meters or 5.37 cubic feet. Restated, the urine produced by an adult fertilized 5.37 cubic feet of soil. There are 7.48 gallons in one cubic foot, more than I thought. Relative to the soil in a two gallon planter, if 5.79 cups of urine was added to 5.37 cubic feet of soil per day, how much would that be for just two gallons? 5.79 cups is the amount of urine that was added to 5.37 cubic feet of soil per day. By dividing the gallons by the volume, we arrive at a rate of 1.08 cups of urine applied to each cubic foot of soil. A two gallon container holds approximately .267 cubic feet. .267 cubic feet per planter X 1.08 cups per cubic feet in the research = .29 cups of urine per day for a two gallon pot.
6- Linda Chalker-Scott, PhD, Master Gardener, WSU editor, Extension Urban Horticulturist and Associate Professor, Puyallup Research and Extension Center, Washington State University, Puyallup, Washington: published in MasterGardener, Autumn 2007, www.MasterGardenerOnline.com,http://puyallup.wsu.edu/~linda%20chalker-scott/horticultural%20myths_files/Myths/magazine%20pdfs/MythsHydrogels.pdf.
7- http://everydaylife.globalpost.com/gel-balls-diapers-harmful-4431.html, Are the Gel Balls in Diapers Harmful? by Lori A. Selke, Demand Media
8- http://www.mdpi.com/2073-4441/6/7/2056/htm, Experimental Assessment of the Use of a Novel Superabsorbent polymer (SAP) for the Optimization of Water Consumption in Agricultural Irrigation Process, Giuseppe Cannazza , Et.al., Department of Engineering for Innovation, University of Salento, Complesso Ecotekne, Edificio Corpo O, via Monteroni, Lecce 73100, Italy
9- http://www.ijfse.com/index.php/IJFSE/article/download/IJFSE-Vol%202%281%29-2012-4/28, S. Shooshtarian, J. Abedi-Kupai, A. TehraniFar (2012). Evaluation of Application of Superabsorbent Polymers in Green Space of Arid and Semi-Arid Regions with emphasis on Iran, International Journal of Forest, Soil and Erosion, 2 (1):24-36.

Here I Sit in Zone 5: Spring Fever & Extending the Growing Season


Inside - Part I - Equipping an Inside Greenhouse


DD 2-1/2 Dogs

Most of this project has a 1 Dog DD Degree of Difficulty. However, the LED light strips have a short learning curve & if you're like me, you'll have to order connectors you didn't think to order with the roll.


I started with inexpensive IKEA wood shelves seemingly designed to hold full-size seed trays: GORM Shelving $29.99 300.585.08.
I added diamond plate steel shop lights: Lithonia Diamond Plate Shop Light $29.97 , no special bulbs are needed.


More recently, I added LED light strips like these: 5050 LED Waterproof Light Strip. Basically, the flexible SMD 3528 LED light strips have one LED light emitting chip per source & the 5050 SMD has 3 chips in one housing. You need that power to achieve the needed light & heat for germination. The benefit over the fluorescent fixture is reported to be a higher light level at lower power consumption.

More recently, I added LED light strips like these: 5050 LED Waterproof Light Strip. Basically, the flexible SMD 3528 LED light strips have one LED light emitting chip per source & the 5050 SMD has 3 chips in one housing. You need that power to achieve the needed light & heat for germination. The benefit over the fluorescent fixture is reported to be a higher light level at lower power consumption. I also supplied bottom heat. I added my LED Christmas lights under a cookie sheet for extra good measure just until the second full set of leaves emerged. I provided air circulation, but prevented AC drafts that could stunt growth. I placed a sticky (boy is that an understatement) fly trap to catch gnats. I put it in the center of a shelf, away from drafts - gnats will congregate in still air. Besides, you do not want these traps at your entry points - I got one stuck in my hair that way. Lesson learned! I covered the whole kit & caboodle with plastic sheeting, closed at ends with clothes pins. I can accessed the shelves easily from the sides to water and adjust lights. Lights need to be just above the top leaves - higher and they'll be spindly.


Outside - Part II - Making a Cold Frame


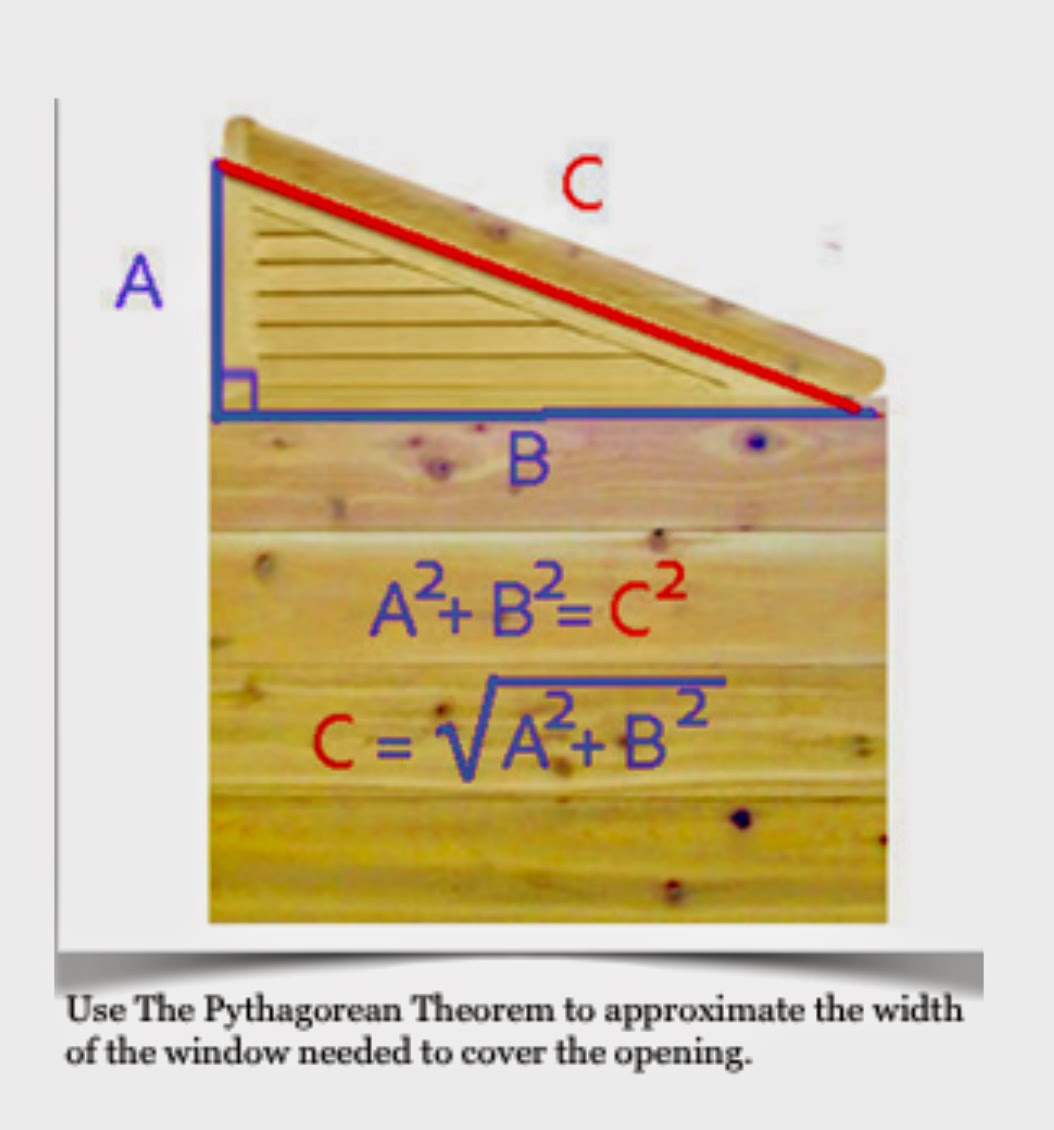
Making the cold frame involves cuts on an angle, Jig Saw or Circular Saw, hammer, However, the LED light strips have a short learning curve & if you're like me, you'll have to order connectors you didn't think to order with the roll.


Since I was starting seeds under lights in the house, I needed a good place to harden them off before planting. If I wanted to extend my growing season, I needed a cold frame big enough to accommodate standard 11.5” x 22” seed trays. I thought that I’d be better off with room to suspend four to six trays. I started with a photograph found in a Pin. I read posts by bloggers, with experience in building cold frames looking for clear directions & advice. Clear directions were not to be found, but oddly, they uniformly regretted their self imposed limits - they wished their cold frame was bigger! I wondered the regret was a case of a gardener dreaming of a greenhouse & settling for a cold frame. I took the picture & considered the advice & set out to buy or find supplies.


I found enough cedar on sale at a big box store to make a chest with no bottom, the back side higher than the front to catch the light, deep enough for leafy plants, width sufficient to hold the length of plant trays & long enough to hold four to six trays.

Knowing the dimensions of the cedar gave me basic information needed to develop a simple sketch & notes with dimensions.

  • Specific dimensions were calculated: 
  • Standard plant trays area 22.5" X 11.5". I saved trays from other planting projects & had plenty for either dimension.
  • Cold Frame Width - 22.5” (with 1/2” for wiggle room to accommodate the length of the seed tray.)
  • Frame Minimum Length: four trays, 11.5” * 4 = 46”, or for six trays, 11.5” * 6 = 69” long.
  • Frame Front Height: I planned on hanging the plant trays on rails approximately 4" above the bottom edge of the wall for good air circulation & drainage out of the bottom of the trays. I added another 4” for the tray itself. I decided to add another 8” for the growing leaf layer from the top of the tray to the window. 4" + 4" +8" = 16” tall (you may have other needs and will adjust your plan to accommodate your plants).
  • Frame Back Height: I wanted to add about 8" to the height of the front wall to get a nice angle on the window. 16” + 8” = 24”.
  • Window Length (Estimate): Before making any more calculations, I needed to buy a window. To fit the trays, it needed to be at least 46” or 69” long . The window should be a bit longer than the combined width of 4 or 6 trays, or the trays will be as tight as a row of airline seats. It can be longer, since it sits on top of the frame, overlap is acceptable.
  • Window Width (estimate): I also knew that it needed to be wider than 22.5", the depth of the box & length of the plant trays. The more difficult part needed a thought or two & calculations using that algebra that, we swore to each other, we'd never use again once we left school, Thinking things through, I figured the window needed to be wide enough to span an opening that was wider than the opening because the top of the back wall will be higher than the front, but just how wide does the window need to be? Algebra held the answer. (Remember that Pythagorean Theorem?) The window, stretching from the lower front to the taller back would form the hypotenuse of the right triangle, marked as "C" in the diagram. The equation for the hypotenuse of a right triangle (I bet you never thought you’d use that again!) When you have a higher back than front, you create a right triangle, so window width can be estimated as the hypotenuse of that triangle based on the known base and height.


Pythagorean theorem formula for right triangles is A^2+ B^2 = C^2. If you can fill in two of the three variables, you can calculate the third. "A" and "B" were known by design, so I solved for "C", the minimum width of the window.

  • ”A” is the rise of the back above the front lip (8”), A^2 = 64
  • "B" is the width of the cold frame, 22.5" and B^2 = 506.25
  • "C" is equal to: √ (8^2+ 22.5^2) = √ (64+ 506.25) = √ 570.25. = 23.88". I needed to find a window that was about 24" or slighting wider (an overhang of an inch or so can be eased into the design).

If I already had a window, I would solve for "A" & fill in "C" &"B" to calculate the height of the back wall above the top of the front wall - "B" is the length of the trays, a constant for practical purposes. A window wider than 24" wide, would need more than an 8" taller back wall like that in the previous example. There are several variables, but the solution remains relatively easy. that will fit the window onto a box that is the correct size. "A" = √(C^2 - B^2). (Oh, wouldn’t Mr. Henderson be proud to know that I remembered this bit of algebra?)

I found a window at the Habitat for Humanity Resale Store, a real beauty with divided lights & muntins. It was just the right size. A piano hinge on the back was the perfect solution for joining the window to the back wall. It was easy to lift and quite stable. I thought about adding legs below the level of the tray bottoms, I wouldn't lose tray space. I decided to set my frame on top of bricks instead, to easily get airflow under the bottom edge. I also made a notched stick to hold the edge of the window up for ventilation. I bolted it to the side, with doubled up washers for slip, but I put it on the outside, so I can't use it since the window doesn't overhang the edge by much. I made another one with notched out triangles on both ends to catch the edge of the frame and the edge of the front wall. The window is long enough that I really should have made two props, to keep the window from sagging.


I recommend this relatively easy utilitarian project because it is very useful for seed starting and I have gotten very good use out of mine - in Spring when I was ready to move seedlings outside, In Fall when a frost threatened the late season containers & as art. My husband came home dragging a twin headboard & foot board for my "baby bed". Later, I added counting sheep, resting in their "incubator" We didn't want to have it lacking in purpose after spring seedlings are planted…


Spring Cleaning in the Garden

May 2014


Cleaning & Pruning

 As soon as I see the first flush of color in my garden, I spring into action with a small hand held rake that I use to carefully remove leaves from under each and every plant. It isn’t as hard as it sounds, and it gives me a chance to assess each plant for dead stems and branches, pruning as I go. Big oak leaves prevent water from penetrating the soil and provide cover for critters that might like a taste. I run all of my leaves through a shredder made for leaves, and use them to supplement mulch and as brown material in compost throughout the green seasons.

On my rounds, I pruned some shrubs – cutting behind spent blooms on hydrangeas and viburnums, clipped out dead, damaged or diseased branches, trimmed summer blooming shrubs to a desirable height (I never prune spring bloomers at this time or I forfeit almost all blooms). I sheared ornamental grasses to a height above the greening crown, well above ground level. I pulled dried flower stalks left behind for winter interest and food for birds. Sometimes I save spent Day lily fronds for craft projects (they make an inexpensive substitute for raffia).

I clean out containers of any dead annuals, making them ready for new plants and seeds. A soaking mixture of one part bleach to 10 parts warm water with a smidgen of dish soap will loosen soil and make clean up easier. Rinse thoroughly and allow to dry completely, preferably in the sun. Sanitation is the best pest control of all control measures.

Spring is the time to evaluate, trim and divide ornamental grasses. I leave the arching fronds and tan flowers for vertical interest in winter, although many could have been cut back in fall or winter. Officially, most garden sites recommend that you vary trimming for your grasses based on if it is a cool season or warm season grass. Generally, cool season ornamental grasses green up early in spring, almost as soon as temperatures exceed freezing, flowering early in summer. You might think warm season grasses died in the winter because it takes so long for them to send up new growth. Phalaris (ribbon grass), Stipa (feather grass), sea oats, tufted hair grass are all cool season grasses. Pampas, little and big bluestem, Miscanthus (maiden hair), Japanese blood grass, and fountain grass are warm season grasses.

If you wait too long to trim cool season grasses, you will have a hard time taking out the dried blades of last year without trimming the emerging leaves of this year – and they will be trimmed for the whole season. I leave about 1/3 of the plant, always cutting above the green, always above the point where the new leaves emerge from the stems or the plant can be irrevocably damaged. As hard as it is to believe, the new growth will quickly hide the bristling tan porcupines. I look like Edward Scissorhands out there – tossing great gobs of tan leaves left and right as I go, but I’ve seen people tie the leaves about half way up the stalk so they were able to carry off the trimmings in one bundle, but I think it’s harder to cut and I’ve never managed to keep the leaves in a bundle throughout the haircut.

I blow leaves and grass into a pile for shredding, paying careful attention to the rock sections where I have created dry creeks to manage water draining from the roof. As I do, I am reminded not to use rock in the garden needlessly – for example, as mulch. Rocks do not effectively prevent weeds and leaves cling stubbornly, showing up in stark color and textural contrast. They also create a microclimate in summer – similar to that of a hot oven.

Tree Care

Trees deserve a few thoughts in spring if we want to save them from ourselves and our best of intentions. Anything that stresses a tree brings weakens it and any injury to the trunk will allow infectious agents and pests to access to the interior where further damage is done, possibly decimating the tree. I have four hard and fast rules regarding trees. They are: 1) Do not top trees – ever. Trees must be allowed to reach their mature height and form and if that can’t be done, remove it and choose better for your landscape next time. 2) Mulch with two to four inches of mulch or leaf mold but not in contact with the trunk. Leave a clear ring around the tree that is about eight inches wide. Too much mulch smothers the roots and mulch in direct contact with the trunk softens the bark. 3) I like to keep plants out of the root zone because most of a tree’s roots are within the top 18 inches of the soil. I plant outside of the root zone, and as the tree extends beyond those plantings over time, any care that I provide to them is secondary to the needs of the tree. 4) Mechanical injury is another way in which we damage trees; those string trimmers should never touch the trunk of a tree.

Dividing

I never divide or share non-native and invasive plants. I check the lists of the Illinois Invasive Species Council before buying a new plant or dividing one in my yard. The United States Department of Agriculture (USDA) has detailed plant files and a page devoted to links to federal and state lists: https://plants.usda.gov/java/noxiousDriver. There are Federally listed non-native and invasive plants and it is illegal to share it, not that the plant police are going to show up at your home to take you away, but that they pose a real economic an biologic threat and I want to comply with the spirit of the law, removing them and discarding of them appropriately as I learn of their listing. The Federally listed noxious invasive plants include some well know plants, like water hyacinth, hydrilla, cattails, mimosa and many more.

Grasses need frequent dividing, every three to five years (five years for me) for renewal when the dead center becomes a notable hole. For all grasses and sedges, spring dividing is a safe bet. I never divide in summer when grasses are flowering, and I have all than I can manage in fall, when cool season grasses are safely divided, and so spring it is. At first, I was delighted for the multiplication, adding new clumps at almost no cost, but I was quickly sharing as I ran out of room for more stands and now, as often as not, I am composting the extra material, as reluctant as I am to let even an extra seed go unused.

I choose a cloudy day, preferably moist and cool to help prevent roots from drying. Digging grasses up can be challenging as their roots can be quite deep. I do my best to remove the root ball intact, I then make one slice to the center with a large finely serrated knife (devoted to gardening and never returned to the kitchen). With gloved fingers or forked hand cultivator or some combination of the two, I pry the ball apart, forcing it from a rounded ball into a row, with the center facing upward. I pull out as much dead material as possible and pull the row apart into as many plants as I have need for, usually into thirds or fourths. For very deeply rooted grasses, I like to use a drywall saw to plunge into the soil, sawing around the root ball and making as many divisions as I need. Pry plugs out and discard the dead center.

Many other perennials need to be divided occasionally, perhaps not as often as do grasses, but you will know when it’s time – the plant begins to perform rly when the soil in its sphere has been depleted and the roots are compacted, sometimes to the point that they are no longer capable of taking up even water. For this task, as a rule of thumb, I begin digging at the drip line, removing as much of the root ball as possible. I lay the plant out on the ground where I can drive my shovel into the center to divide the plant in half and in half again, quartering the plant. I then remove as much damaged or dead debris and plant it, pot it up for sharing, consign it to the compost heap or otherwise properly dispose of the remainder. As with any plant, I make a hole as deep as needed to keep the plant at the same height as it was originally, but not more, I spread out the roots as possible and I plant with native soil mixed with about equal parts compost.

Feeding

I feed my lawn and garden in spring. Different areas need different treatments. I choose between granular fertilizer, liquid fertilizer and compost applied to the outer root zone, the only place a plant is able to take up the nutrients. When I do use fertilizer, I always read the entire label and follow the directions without fail. Generally, mono-ammonium phosphate and ammonium polyphosphate, either alone or with some added potassium, make excellent starter fertilizers because of their high phosphorus to nitrogen ratios, high water solubility, and low free ammonia. As a general rule, unless a soil test indicates otherwise, I apply up to one pound of nitrogen per 1000 sq. ft., about ¼ what you would apply to grass. But, if I have it, I apply one inch of compost or leaf mold and eliminate additional fertilizer altogether. This is where having a good understanding of each plant’s needs while observing leaf color and growth habit will help you avoid excessive use of fertilizer.

I like Osmocote in containers and side-dress shrubs and perennials. Applying the Osmocote at the root zone and not right on top of the plant where it could burn the plant. Otherwise, I apply an inch of shredded leaves that have been decomposing in bags the winter, mixed with compost if I have it, favoring something with a little magic horse assisted potency, scattered around shrubs and perennials. In turf grass, I apply either a 10-10-10 granular fertilizer or scatter compost. I do not fertilize ornamental grasses as they can flop over if they have a flush of nitrogen induced growth. Later, I apply liquid fertilizer to containers filled with heavy feeders, as always, according to directions. If I did this to perennials or shrubs, they would produce week and floppy growth that might never harden off, so I rarely hit perennials with a second application.


Mulching

I add an inch of shredded leaves to all landscaped areas, around trees and under shrubs, but never within a few inches of the plant, or within four to six inches of the trunk of a tree. On top of that, I add a first cut shredded mulch or up to triple shredded mulch. Studies now indicate that the rougher shredded mulch performs better, much to my surprise. This top mulch also must not be in contact with the plant body. Mulch volcanoes are an abomination, almost guaranteed to kill a tree within three to five years, long enough for most homeowners to believe that the mulch could not be responsible for the decline.